Currently listening to…
(on tape)
If you couldn’t tell, it’s my website so I get to insist that music goes in every post :)
Two things I want to point out before moving on to the guide – first, look at that! I finally got around to writing a shortcode for bandcamp albums, so I can easily embed them. I’ll change it up a little bit and allow it to embed music from YouTube as well, for example, but for now this is it!
Second, I chose quite a long (and 100% free!) album for this post, so if you’re just looking for something to put on in the background while setting your Outbreak server up, this almost 7 hour monster has a lot of variety throughout and doesn’t demand a whole lot of attention. What are you waiting for? Go ahead and click play :D
Biohazard: Outbreak Server Setup
Hi friends. This is a guide on setting up a Resident Evil/Biohazard Outbreak server without relying on the outdated Raspberry Pi .OVA image floating around. I have begun the process of cloning and modernizing ghostline’s original repos over on my github, and this guide will make use of my repo & receive updates as the repo does.
This wouldn’t be possible without these individuals:
- ghostline, who wrote the original server code & how-to PDF
- Firewarrior565, who brought this project idea to me
- refan988, who created the Raspbian OVA
- DingoYabuki, who made the “How to Run a Local Resident Evil File 1 & 2 Server” video, showing how to configure & use the Raspbian OVA
If you’d like to reference DingoYabuki’s video on getting the OVA up and running, here are the relevant links, but neither of these links are required for following this guide:
refan988’s OVA: https://drive.google.com/file/d/1kBbvdSo0HLtzc4sdaHE5MVcb8wuXPxh7/view
DingoYabuku’s Video: https://www.youtube.com/watch?v=ZSYnMp6aJE0
These instructions can be translated relatively easily between OS’s, but I’ll base everything off of Debian given its ubiquity. And, as a final note, the images in this guide are rendered in a lower quality unless you click to view them in original quality.
Updates
3/25/23
Guide updated to utilize my git repos; DNASrep is essentially a straight-up copy of ghostline’s, whereas the bioserver repo is patched up to make configuration simpler & quicker.
3/12/23
Initial commits for the bioserver-docker repo that brings the server into a docker container. A current glaring problem with the docker image is that the SQL server resides inside of the container, and is destroyed when the container is updated, effectively wiping out the entire database with every update. It’s an interesting novelty right now, but currently cannot supplant this guide.
3/4/23
I’ve been writing this over the last week or two, and it’s finally time to post it! I suppose this is the “initial commit.” I mention this a bit later but, feel free to reference the repo on my github while you’re patching everything up.
Debian
I’ll use a Proxmox VM but you can use whatever you’d like (ie: virtualbox)
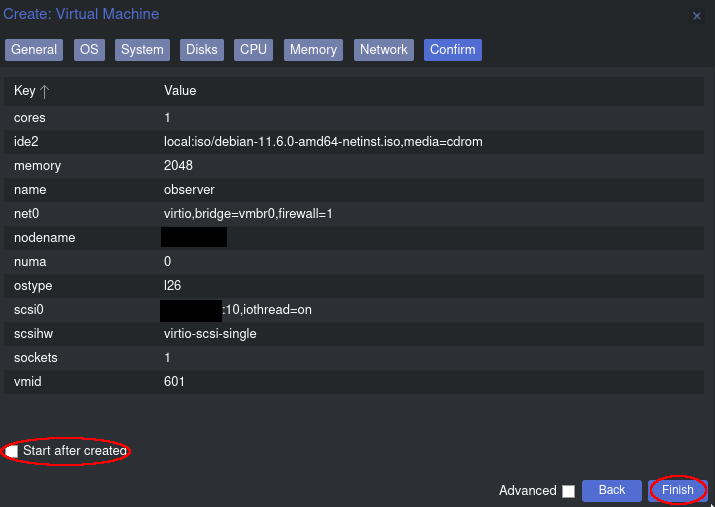
I’ll give my VM the name ‘observer’ and start by mounting the debian-11.6.0-amd64-netinst.iso image. I’ll give it a 10GB disk size with a single CPU core, as well as 2GB of RAM. Otherwise, all of the settings I’m using are default. I choose to start the container immediately after clicking “Finish” –
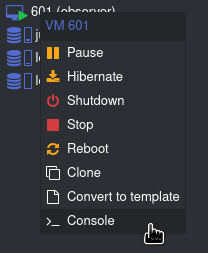
Now I’d like a shell into the VM. With Proxmox, simply right click on the container and click Shell
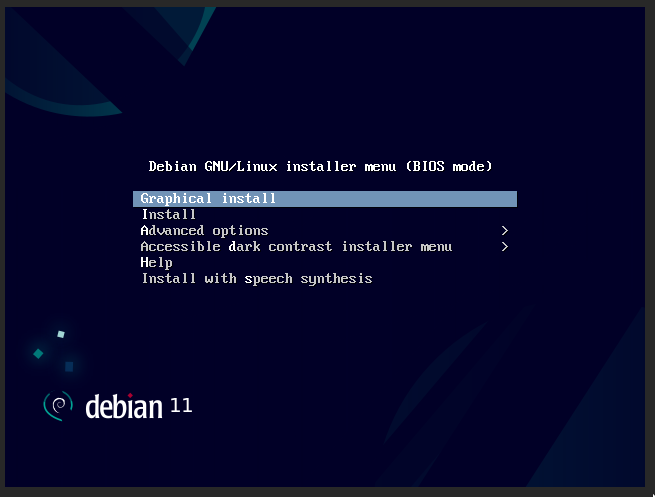
A KVM-like window will pop up looking something like this. You can likely use the graphical installer, but I’m instead choosing to select “install,” the text-based installer:
Follow through the install until you’re selecting the hostname. I like to have my Proxmox VM/container names match the hostname, so I name it observer
The next screen asks for us to select a domain name. I type in some nonsense and continue onward
Next you’ll select the root password; choose something you’ll remember
After this, some user info. I enter my full name as observer, my username as observer, and chose a password for my user account
Continue on until you reach the disk partitioner. This is personal preference, but to keep things simple I’ll allow Debian to do this all for me by selecting Guided - use entire disk. A few screens later, I’ll select All files in one partition (recommended for new users) as the partitioning scheme. Here’s what it’s selected for me:
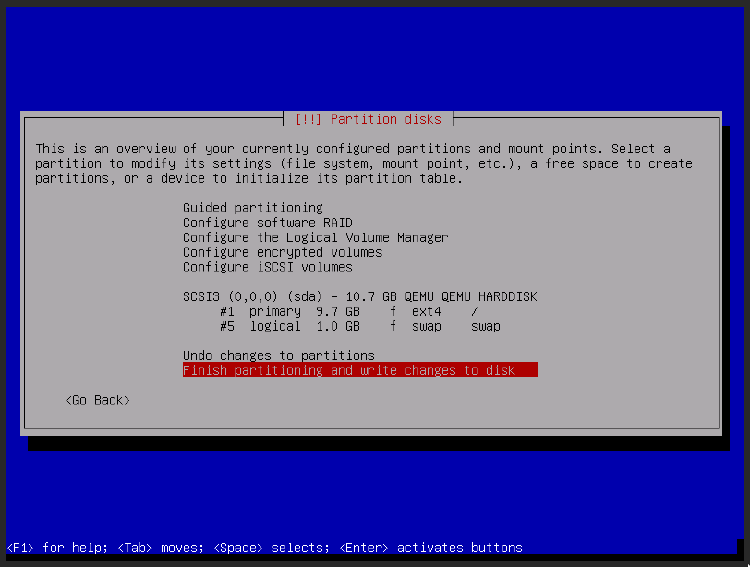
It will confirm that we want to write these changes to the disk, and we’ll select Yes
It will now install the base system. Once it’s complete, it’ll ask us if we’d like to scan additional media; we’ll select No. The next few screens asks us where we’re located and which Debian mirror to use; I opted for the defaults (United States and deb.debian.org), but you may want to update these settings depending on your location. Decide whether or not you’d like to participate in the package usage survey, and continue on.
You can probably get away with installing a desktop environment and configuring everything that way, but I will be working strictly over SSH. Note that if you opt not to use SSH, you will essentially just want to follow along by either opening a terminal in your installation’s DE (default is GNOME), or you could even forego a DE entirely and simply do everything over the Console in Proxmox instead.
Use the arrow keys, space bar, and tab to navigate this menu (per the directions at the bottom of the screen). Here is how I’m choosing to configure mine. Do note that, even though we will be installing a web server, we will not be installing it now:
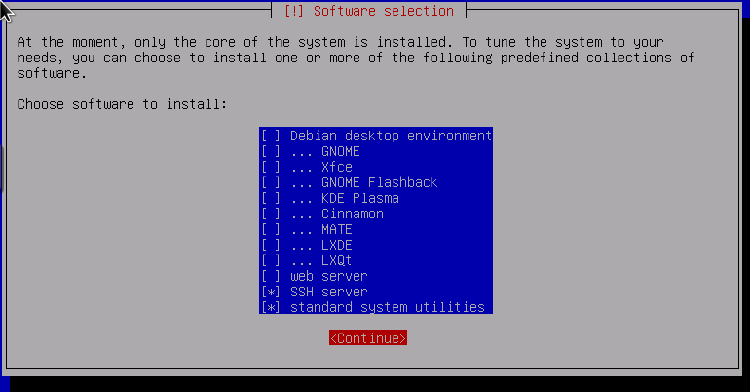
After installing all of these packages, it’ll ask us if we’d like to install the GRUB bootloader. Choosing not to use GRUB is outside the scope of this guide, so I will say to go ahead and select Yes unless you’re certain you know what you’re doing. On the next screen we’ll choose to install it onto the same drive we just installed Debian onto (probably /dev/sda)
If you’ve never installed Linux before, congrats on your first installation! You should see the screen below; read on before making a selection, however

We’re being reminded to remove the installation media. If you decided to install this on a bare metal system, that simply means to remove the USB stick/CD. If you chose to install in a VM, you’ll want to go back to your VM application and “remove” the ISO. This is how to accomplish that on Proxmox –
Select your VM, then the Hardware tab, then the CD/DVD Drive, click Edit, select Do not use any media, and click OK
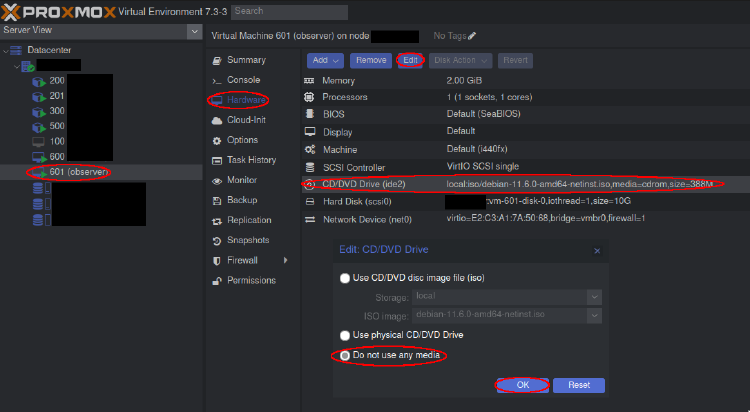
Perfect! Now go ahead and select Continue in the Debian installer. It’ll reboot to your freshly-installed Debian. We’ll only sign in for a quick moment before switching to ssh, but for now go ahead and sign in as root the command ip address. We’re just looking for the IP that our device was given:
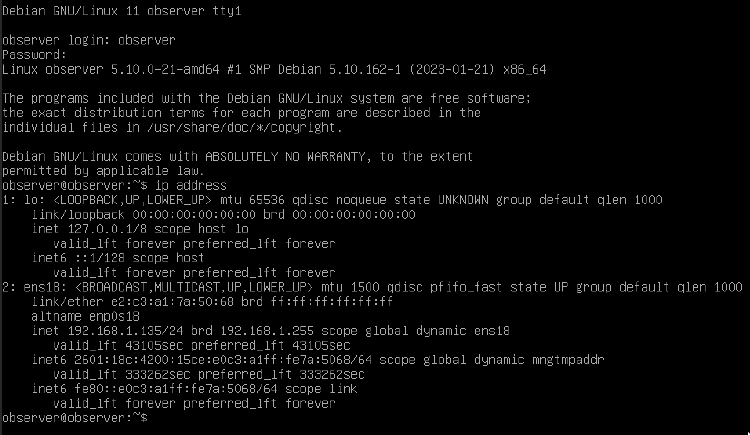
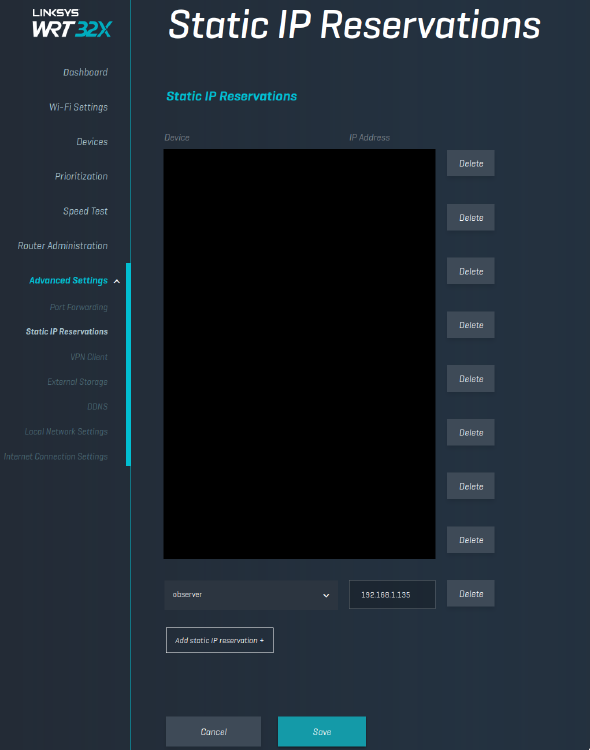
In our case, we were given the IP 192.168.1.135. Now, we ideally don’t want this IP address to change between reboots or over time. A complete overview of how to set up a static IP address is a little beyond the scope of this guide, but this is what it looks like on my router page:
Back in the console, we’ll run apt update && apt upgrade to make sure everything is updated
While signed into our user account, we need to be able to run commands as root when appropriate. sudo is not installed by default, so go ahead and type apt install sudo
Once this is installed, write the command visudo, which will open up the sudoers file in nano and allow us to add our user account in there. We’re looking to add a line like this:
username ALL=(ALL) ALL
The name of my user account is observer, so this is what mine looks like:
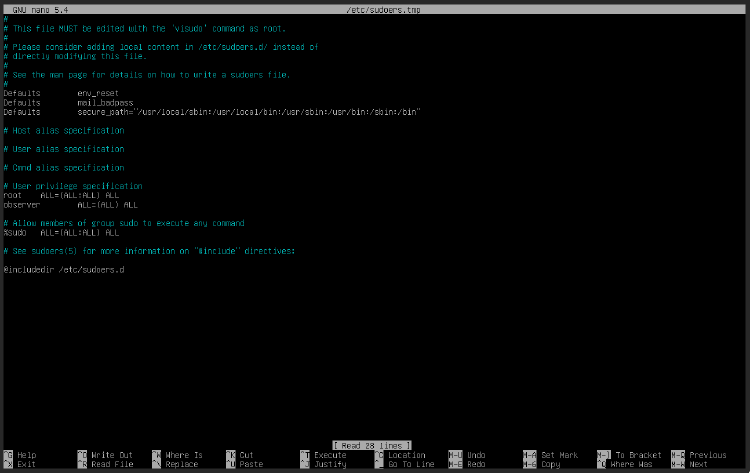
Use the arrow keys to navigate the file, and type on your keyboard like normal. The reason for the large gap after observer is because I used a tab rather than a space
Push CTRL-X to exit, Y to save and push Enter. Leave the default filename alone; it’s a temp file, but that temp file is how visudo works
From here, it’s ssh time! Go ahead and type exit into the console to sign out, and close out of this shell. On Windows, you can use Putty. On Linux, simply use the standard ssh client. I’ll be using ssh. Once signed in, let’s do a quick sanity check:
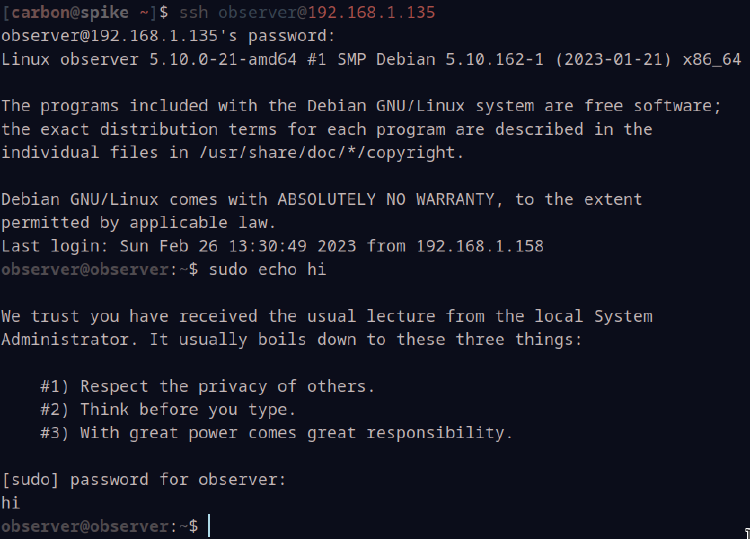
Perfect! sudo is working as intended!
Installing prerequisites
Several packages from Debian’s default repos will be required. Adjustments may have to be made as packages receive updates, which is exactly what made this guide a necessity in the first place. I will note the version used below. Besides OpenSSL, which is a special case, I use all of the newest packages available in Debian’s standard repos.
These packages can be installed via sudo apt install [packagename] or via sudo apt install [package1] [package2] [package3] [..etc]
| package name | version |
|---|---|
| sudo | ?? |
| make | 4.3-4.1 |
| gcc | 10.2.1 20210110 |
| dnsmasq | 2.85-1 |
| dnsutils | 1:9.16.37-1 |
| unzip | ?? |
| php-fpm | 7.4.33-1 |
| mariadb-server | 10.5.18 |
| php7.4-mysql | 7.4.33 |
| openjdk-17-jre-headless | 17.0.6 |
| openjdk-17-jre | 17.0.6 |
| default-jdk | ?? |
Don’t ask me for version numbers for the following :) but we also install these dependencies for building Apache later:
| package name |
|---|
| libpcre3 |
| libpcre3-dev |
| libexpat1 |
| libexpat1-dev |
| libxml2 |
| libxml2-dev |
| libxslt1-dev |
| libxslt1.1 |
OpenSSL
According to the original installation document, the DNAS server requires weak ciphers, and recommends using an older version of OpenSSL as a result. I haven’t done any testing with any other versions of SSL, and I simply use what the original guide recommends here
Let’s download OpenSSL 1.0.2, unzip it, and make it
wget https://www.openssl.org/source/openssl-1.0.2q.tar.gz
tar xzvf openssl-1.0.2q.tar.gz
cd openssl-1.0.2q
and
./config --prefix=/opt/openssl-1.0.2 \
--openssldir=/etc/ssl \
shared enable-weak-ssl-ciphers \
enable-ssl3 enable-ssl3-method \
enable-ssl2 \
-Wl,-rpath=/opt/openssl-1.0.2/lib
You should see a message similar to this:
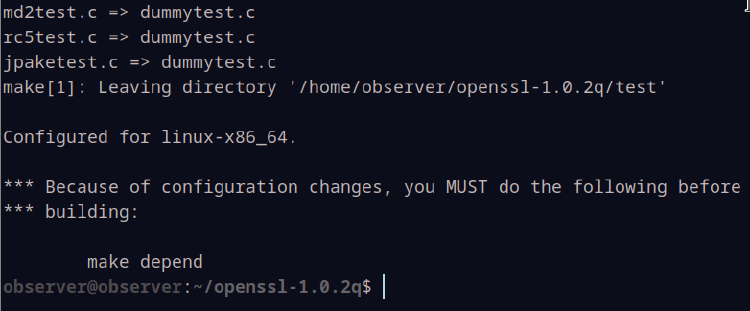
Go ahead and run the make depend command as it tells us to. If you run into errors with this command, first verify that you have gcc installed. Once you’re certain of that, you can try re-running the ./config [...] command followed by make depend once again.
If you’re having trouble running that longer, multi-line .config [...] command, what I tend to do with these longer commands is create a file named something like configuration.sh, put #!/bin/bash as the first line, and then paste the ./config [...] command right below that. Save it, then run chmod +x ./configuration.sh and finally ./configuration.sh by itself before attempting to run make depend again.
Once that’s situated, issue the command make by itself. And once that finishes, let’s go ahead and run sudo make install
To verify that everything is configured correctly, run this command and compare your output to the image below. I’m no expert on ciphers but I believe EDH-DSS-DES-CBC3-SHA is the primary cipher we’re focused on:
/opt/openssl-1.0.2/bin/openssl ciphers -V 'ALL' | grep 0x13

Apache2
Now let’s build a webserver that can actually use the custom OpenSSL we just compiled
Issue this command: ls /etc/ld.so.conf.d/
Depending on your architecture, you may see something like arm-linux-gnueabihf.conf in addition to libc.conf. In my case, I see a file named x86_64-linux-gnu.conf.

Issue a sudo nano command to modify this file: sudo nano /etc/ld.so.conf.d/x86_64-linux-gnu.conf (substituting x86_64[...] with whatever the name of your file is)
Add the following to the top of your file:
# custom OpenSSL
/opt/openssl-1.0.2/lib
It’ll end up looking like this:
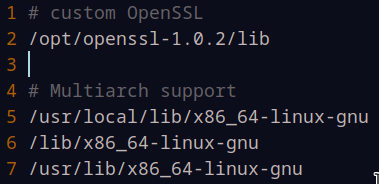
Save and exit, and then run sudo ldconfig. This shouldn’t produce any output.
Before continuing, get back into your home directory by typing cd. You can verify this by typing pwd as well, which should output /home/[username] (in my case, /home/observer)
Next, let’s sort out some build dependencies:
sudo apt update
sudo apt install libpcre3 libpcre3-dev
sudo apt install libexpat1 libexpat1-dev libxml2 libxml2-dev libxslt1-dev libxslt1.1
Assuming that all went well, let’s download the newest version of Apache2 from its website:
https://httpd.apache.org/download.cgi#apache24
As of this writing, the latest available version is 2.4.56
Go ahead and download the .tar.gz source tarball by typing wget [url.goes/here.tar.gz]. As of the time of this writing, that command would be wget https://dlcdn.apache.org/httpd/httpd-2.4.56.tar.gz
Next, let’s visit the Apache Portable Runtime download page. We’re looking for both APR as well as APR-util. As of the time of this writing, the newest versions are APR 1.7.2 and APR-util 1.6.3. Again, we want the .tar.gz
https://apr.apache.org/download.cgi
Currently, these commands would be:
wget https://dlcdn.apache.org//apr/apr-1.7.2.tar.gz
and
wget https://dlcdn.apache.org//apr/apr-util-1.6.3.tar.gz
Let’s extract Apache, enter its srclib directory, extract the APR tarballs in there, create soft links, configure and finally build our Apache server! Phew, what a mouthful. Substitute any incorrect version numbers in your commands. Tab completion is your friend – for example, as you type cd http[...], if you push tab and httpd-2.4.56 is the only directory that begins with http, the shell will automatically complete the name of the directory for you.
tar xzvf httpd-2.4.56.tar.gz
cd httpd-2.4.56/srclib/
tar xzvf ~/apr-1.7.2.tar.gz
tar xzvf ~/apr-util-1.6.3.tar.gz
ln -s apr-1.7.2 apr
ln -s apr-util-1.6.3 apr-util
cd ~/httpd-2.4.56/
Now the long, multi-line ./configure command. Feel free to use the same “./configuration.sh” advice earlier in this document if you experience any trouble. Otherwise, go ahead and write this in your terminal just as you would any other command, being mindful of the difference between a forwardslash vs backslash / vs \:
./configure --prefix=/opt/apache \
--with-included-apr \
--with-ssl=/opt/openssl-1.0.2 \
--enable-ssl
Let’s make & install:
make
sudo make install
Let’s make a slight modification to the envvars file to add our install of OpenSSL to $LD_LIBRARY_PATH. Issue the command nano /opt/apache/bin/envvars to modify this file, and place the following line just above the export line, as is visible in the screenshot on line 26. Save and exit the file afterwards:
LD_LIBRARY_PATH="/opt/openssl-1.0.2/lib:$LD_LIBRARY_PATH"

Currently, we can start Apache by issuing the command /opt/apache/bin/apachectl -k start, but it’s probably best if we create a systemd service file and start/stop it with that instead. Issue the command sudo nano /etc/systemd/system/apache.service to modify this file, and put the following contents into it:
[Unit]
Description=Apache Server for Outbreak

[Service]
Type = forking
EnvironmentFile=/opt/apache/bin/envvars
PIDFile=/opt/apache/logs/httpd.pid
ExecStart=/opt/apache/bin/apachectl -k start
ExecReload=/opt/apache/bin/apachectl graceful
ExecStop=/opt/apache/bin/apachectl -k stop
KillSignal=SIGCONT
PrivateTmp=true

[Install]
WantedBy=multi-user.target
Let’s have systemd start this immediately, and automatically run it on boot:
sudo systemctl enable apache.service --now
We can then check its status by writing sudo systemctl status apache, which should produce output similar to the image below:

As far as I understand it, the “Can’t open PID file” error is expected, and ultimately Apache is able to open and modify that file; you can cat /opt/apache/logs/httpd.pid to verify this if you’d like. In any case, the most important thing we’re looking for is that “Active: active (running)” line near the top
SSL isn’t enabled quite yet, but you can verify that other devices on your network are able to connect by visiting your VM’s IP address as if it were an http link. In my case, it would be http://192.168.1.135/. You may or may not need to disable extensions or change your browser’s settings if it refuses to load an http page, as most modern browsers prefer to load https pages instead.
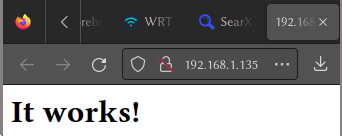
If you’re having trouble getting this to load, it may be worth trying wget 127.0.0.1 and cat index.html. You should see something like <html><body><h1>It works!</h1></body></html>, and you can remove this file once you’re done via rm index.html. If wget works, but attempting to load this page from another machine doesn’t, the problem is likely with your web browser or network and not with your server. Any further troubleshooting is beyond the scope of this guide, however.
DNS
Let’s set up dnsmasq to redirect the PS2 to our VM
We’ll install via sudo apt install dnsmasq dnsutils. The newest versions at the time of this writing are dnsmasq 2.85-1 and dnsutils 1:9.16.37-1.
Let’s replace the original servers Outbreak used with our own via:
sudo nano /etc/dnsmasq.d/obcomsrv
And write this into the file, replacing my VM’s IP with your own:
address=/gate1.jp.dnas.playstation.org/192.168.1.135
address=/www01.kddi-mmbb.jp/192.168.1.135
Save and exit this file.
Next, let’s sudo nano /etc/dnsmasq.conf and uncomment the listen-address= line, and put our VM’s IP as well as localhost. In my case, the line will contain the following text:
listen-address=192.168.1.135,127.0.0.1
Here’s a snippet from the file, where line 111 is our focus, but technically you could add this line anywhere in the configuration:

Restart dnsmasq with sudo systemctl restart dnsmasq and let’s give it a test. Go ahead and write nslookup gate1.jp.dnas.playstation.org 192.168.1.135, again replacing my VM’s IP with your own. This will use your VM’s IP as its DNS server to perform a lookup, and what we want to see is that it resolves to itself:

When you ultimately configure either your PS2 or a PS2 emulator, you’ll be using your VM’s IP address as the DNS server (not to be confused with DNAS). Put simply, your PS2 will reach out to your VM and say, “please connect me with the game server,” and your VM will respond and say, “I am the game server.” The same is true when it attempts to connect to DNAS. Speaking of DNAS…
DNAS
Install git via sudo apt install git
The DNAS service is built on top of a web server running a few PHP scripts. The biggest issue is to create the needed certificates for SSL. Everything else has been covered by compiling OpenSSL and Apache2 with weak ciphers.
Let’s download DNAS from my github repo, put it where it needs to go, and set the permissions correctly. First issue the cd command to get back into your home directory (verify with pwd if you’d like), and let’s get to work:
cd
git clone https://github.com/corbin-ch/DNASrep.git
sudo mv DNASrep/etc/dnas /etc/dnas
sudo chown -R 0:0 /etc/dnas
sudo mkdir /var/www
sudo mv DNASrep/www/dnas /var/www/dnas
sudo chown -R www-data:www-data /var/www/dnas
We’ll install the php-fpm package, which is version 7.4.33-1 as of the time of this writing:
apt install php-fpm
Now we’ll need to set up Apache to run an SSL-enabled PHP webserver with DNAS certificates.
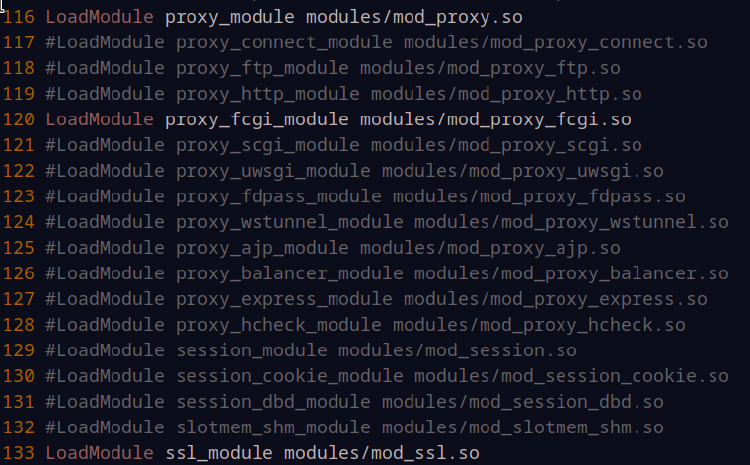
Edit Apache’s http.conf via sudo nano /opt/apache/conf/httpd.conf and we’ll need to enable some modules in order to have SSL and PHP abilities. You’ll need to scroll down a little bit using your arrow keys until you come to the big clump of LoadModule commands in the center. There are 4 modules that we need to enable by uncommenting them (remove the # in front of them). Those modules are rewrite_module, mod_proxy, mod_proxy_fcgi, and mod_ssl. Be aware that many of the modules containing the word “proxy” look similar. Here is an image of 3 of the modules being uncommented:
Directly underneath this big block of LoadModule commands are the User and Group lines. We want them to read as:
User www-data
Group www-data

Lastly, we need to add our server configuration to the end of the file:
<IfModule ssl_module>
        Listen *:443
        SSLEngine on
        # nail it to the securest cipher PS2 understands DHE-RSA-DES-CBC3-SHA
        # check this with openssl
        SSLCipherSuite DHE:!DSS:!AES:!SEED:!CAMELLIA!TLSv1.2
        SSLCertificateFile /etc/dnas/cert-jp.pem
        SSLCertificateKeyFile /etc/dnas/cert-jp-key.pem
        SSLCertificateChainFile /etc/dnas/ca-cert.pem
        ServerName gate1.jp.dnas.playstation.org
        ServerAdmin webmaster@localhost
        DocumentRoot /var/www/dnas
        <Directory />
                Options FollowSymLinks
                AllowOverride None
        </Directory>
        <Directory "/var/www/dnas">
                Options -Indexes
                Require all granted
        </Directory>
        # rewrite some URLs
        RewriteEngine on
        RewriteRule ^(/.*)/v2\.5_i-connect$ $1/connect.php [PT]
        RewriteRule ^(/.*)/i-connect$ $1/connect.php [PT]
        RewriteRule ^(/.*)/v2\.5_d-connect$ $1/connect.php [PT]
        RewriteRule ^(/.*)/v2\.5_others$ $1/others.php [PT]
        RewriteRule ^(/.*)/others$ $1/others.php [PT]
        # send this to php-fpm socket (needs write access!)
        <FilesMatch "\.php$">
                SetHandler "proxy:unix:/var/run/php/php7.4-fpm.sock|fcgi://127.0.0.1"
        </FilesMatch>
        ErrorLog /opt/apache/logs/dnas_error.log
        # Possible values include: debug, info, notice, warn, error, crit, alert, emerg.
        LogLevel debug
        CustomLog /opt/apache/logs/dnas_access.log combined
        <FilesMatch "\.(cgi|shtml|phtml|php)$">
                SSLOptions +StdEnvVars
        </FilesMatch>
        <Directory /usr/lib/cgi-bin>
                SSLOptions +StdEnvVars
        </Directory>
        # we need to downgrade protocol for the DNAS browser
        BrowserMatch "open sesame asdfjkl" \
        nokeepalive ssl-unclean-shutdown \
        downgrade-1.0 force-response-1.0
</IfModule>
Take note of the php-fpm version number in the SetHandler line, as this will change with new php-fpm releases
Finally, restart the Apache server with sudo systemctl restart apache and we should hopefully be in business!
Probably skip this: it is possible to test your Apache server’s SSL with the command wget --no-check-certificate -O - https://gate1.jp.dnas.playstation.org/gai-gw/v2.5_i-connect on a machine using an older version of wget; the OVA linked at the beginning of this guide has an old enough version of wget to do this. You will also need to modify /etc/resolv.conf and change the nameserver variable to match our VM’s IP address. If that sounds like something you want to spend the time doing, go ahead, but otherwise I suggest continuing on and looping back to this paragraph only if you have reason to believe there’s a problem with your SSL configuration in Apache.
File #1 Outbreak Server
The Outbreak servers are Java programs using MySQL as a database backend for managing connections, games, statistics, etc., so we’ll need to install java and mysql:
sudo apt install mariadb-server # newest version is 10.5.18
sudo apt install php7.4-mysql # newest version is 7.4.33
sudo apt install openjdk-17-jre-headless openjdk-17-jre # 17.0.6
To make these steps simpler, we’re going to be working off of my git repo with various fixes already applied (see the repo’s commit history if you’re curious)
Let’s grab the server files for File #1, create the SQL tables, stage the files, and fix their permissions:
cd
git clone https://github.com/corbin-ch/bioserver.git
cd bioserver/bioserv1
sudo mysql -u root < database/bioserver.sql
sudo mkdir /var/www/bhof1
sudo cp www/* /var/www/bhof1
sudo chown -R www-data:www-data /var/www/bhof1
sudo ln -s /var/www/bhof1 /var/www/dnas/00000002
In order for Java to talk to the SQL database, we’ll need to download a connector application. First, visit this website: https://dev.mysql.com/downloads/connector/j/
Next, select Debian Linux and a version (in my case, it’s 11) and click the “Download” button. Right click and copy the link labeled “No thanks, just start my download.” In my case, that link is https://dev.mysql.com/get/Downloads/Connector-J/mysql-connector-j_8.0.32-1debian11_all.deb
Let’s download this, install it, and put it in a simpler place:
cd
wget https://dev.mysql.com/get/Downloads/Connector-J/mysql-connector-j_8.0.32-1debian11_all.deb
dpkg --install mysql-connector-j_8.0.32-1debian11_all.deb
Now, we’ll quickly install the JDK so we can compile these .java files:
sudo apt install default-jdk
cd ~/bioserver/bioserv1/bioserver
javac -cp /usr/share/java/mysql-connector-j-8.0.32.jar:. *.java
Now, let’s cd ~/bioserver/bioserv1 and move some things around
mkdir bin
mkdir bin/bioserver
mv bioserver/*.class bin/bioserver
mv bioserver/config.properties .
mkdir lib
cp /usr/share/java/mysql-connector-j-8.0.32.jar lib/mysql-connector.jar
chmod +x run_file1.sh
Lastly, nano config.properties and replace {{EXTERNAL_IP}} with your VM’s IP address, and see what happens when you try ./run_file1.sh. If all went well, you should see something that looks like this:
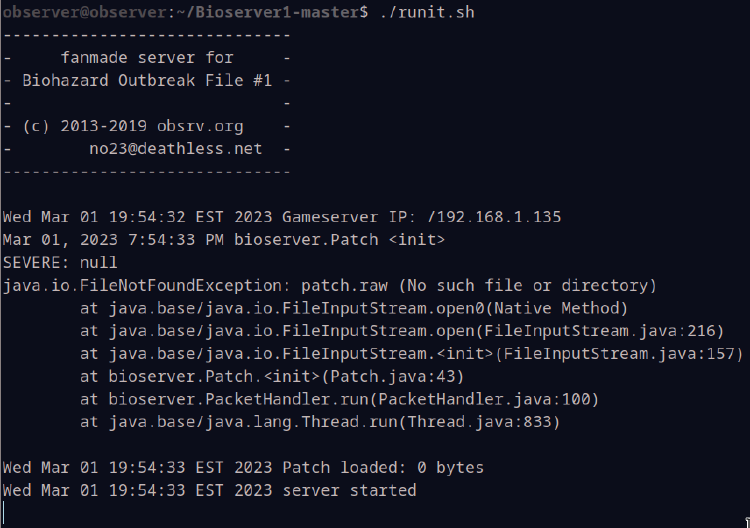
That FileNotFound error is expected, as there is no patch included to apply.
We still have File #2 to set up, but you can attempt to change your DNS settings for PCSX2 and connect if you’d like.
File #2 Outbreak Server
We’re going to essentially repeat the same steps at File #1:
cd ~/bioserver/bioserv2
sudo mysql -u root < database/bioserver.sql
sudo mkdir /var/www/bhof2
sudo cp www/* /var/www/bhof2
sudo chown -R www-data:www-data /var/www/bhof2
sudo ln -s /var/www/bhof2 /var/www/dnas/00000010
cd bioserver
javac -cp /usr/share/java/mysql-connector-j-8.0.32.jar:. *.java
cd ..
mkdir bin
mkdir bin/bioserver
mv bioserver/*.class bin/bioserver
mv bioserver/config.properties .
mkdir lib
cp /usr/share/java/mysql-connector-j-8.0.32.jar lib/mysql-connector.jar
chmod +x run_file2.sh
Modify config.properties to contain your VM’s IP address same as before, and go ahead and ./run_file2.sh and see how it goes!
If all went well, you should now be able to create an account and log in! If you need help configuring your client, I would suggest to use the obsrv.org wiki to set up your PCSX2 or PS2 network settings
c.zip